What is a GOOGLE TAG MANAGER? Why Use it?

Are you unfamiliar with the term Google Tag Manager? If yes, then you probably be questioning yourself about what it is and why it is mandatory to use right? Don’t brood. With this editorial, we will help you puzzle out the most universal questions around the Tag Manager.
What is Google Tag Manager and Why Use it?
Google Tag Manager (also referred to as GTM) is a free tool that lets you manage and deploy various JavaScript Tracking- Codes on your Website without any need to modify the code. This means, with Google Tag Manager you can add and manage various scripts from a single dashboard only! Sounds interesting right?
Apart from that, you can also use custom HTML to add your tracking pixels or any other code snippet that you might want to add.
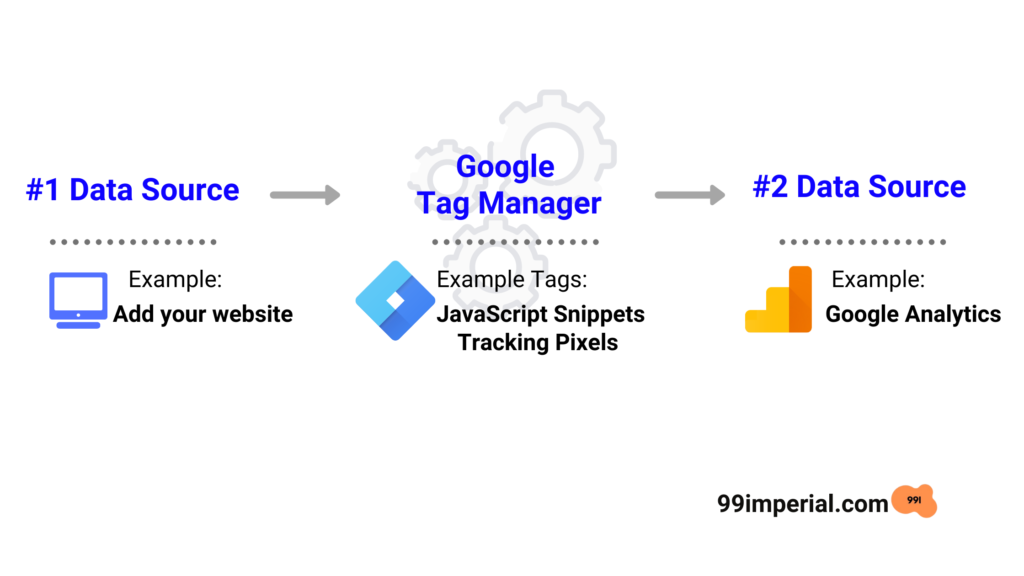
Given below is an example of how GTM works, where we can see that the information captured from data source #1 (which is your website) is shared with another data source (like Google Analytics) through Google Tag Manager.
How Tag Manager works?
If talking about the Tag Manager, all we can think about is the 3 major concepts of GTM: TAGS, TRIGGERS & VARIABLES.
TAGS:
GTM TAGS are the JavaScript Snippets/Tracking Pixels that tells GTM what to do.
Tags are the tracking pixels that can be placed on the back end of your website to perform a particular function. These pieces of code can retarget visitors or track conversions.
Today, there’s not much Tags Can’t Do! Mentioned below are some of the most common Tags within Google Tag Manager:
- Google Analytics Universal tracking code
- Adwords Remarketing code
- Adwords Conversion Tracking code
- Heatmap tracking code (Hotjar, CrazyEgg, etc…)
- Facebook pixels
- DoubleClick
- WordPress
TRIGGERS:
GTM TRIGGERS tells GTM when and how to fire a tag.
VARIABLES:
GTM VARIABLES are the conditions that give additional information GTM might need for the tags and triggers to work.
That’s all about What’s and How’s regarding Google Tag Manager. Now let’s head over to our next topic which is….
STEPS FOR ADDING TAG MANAGER CODE IN WORDPRESS:
Once you’re done with setting up your Google Tag Manager account, The first and foremost thing you will need to work on is to install and activate Insert Headers and Footers plugin. After activation, you will need to visit Settings » Insert Headers and Footers…
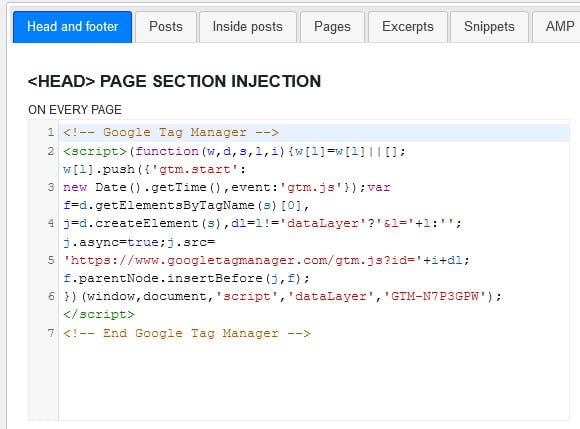
#1 Paste your tag manager code in the header section, inside the opening and closing of the <head> —– </head> tag:
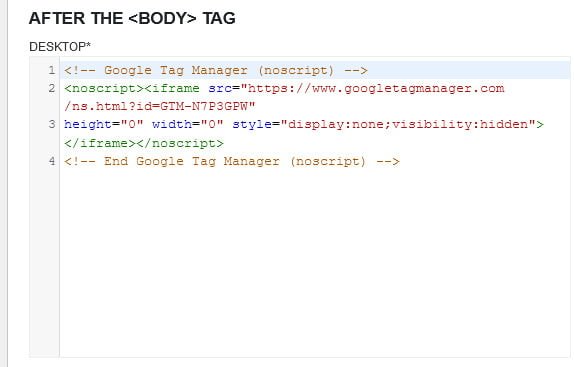
#2 After adding your code to the header section, paste your tag manager code in the body section, inside the opening and closing of the <body> —– </body> tag:
These are the places that you’ll want to paste the code snippets from the Tag Manager. Now, Click on the save button to store your settings.
Testing:
Now to ensure that the Tag Manager has installed properly, reload your website, right-click, and click View Page Source to see the page HTML. Or, You can verify successful installation by opening Google Tag Manager’s Preview Mode by simply clicking the Preview button.
And that’s it! You have now successfully installed and setup the Tag Manager for your WordPress site.
Brain Boner:
With this article, you can say that with the help of the Tag Manager, you can tell what data to share with Google Analytics. It may help your website load faster making the whole process time saving for the users.
тегн binance акаунты
May 5, 2024Your article helped me a lot, is there any more related content? Thanks!
www.binance.com注册
June 16, 2024Your article helped me a lot, is there any more related content? Thanks!
Gichardnoili
June 20, 2024Можете заказать гантельные грифы на https://grify-dlya-gantely.ru/по недорогим ценамподходящей длины. В создании надежных снарядов используются высокопрочные марки металла. Гантельные составляющие предлагаются в трех востребованных диаметрах. Отягощения разработаны для эффективных занятий и созданы с разметкой для правильного размещения рук и насечками для надежного хвата. Продукты покрываются защитным слоем хрома. Российская компания выпускает внушительный ассортимент спортивного инвентаря для дома и зала. Это эффективный инструмент для силовых занятий в любых условиях.
Stephennap
June 21, 2024Ежегодно в середине сентября проводится Тюменский инновационный форум «НЕФТЬГАЗТЭК».
Форум посвящен развитию мнтодов инновационного развития отраслей топливно-энергетического комплекса, дискуссии и определению решений, созданию наилучших условий для развития инновационных проектов. Ежегодный тюменский форум представляетсобой влиятельной дискуссионной площадкой по увеличению роста нефтегазовой сферы в России, имеет высокий авторитет и своевременность, созвучен общей стратегии продвижения инновационного курса в Российской Федерации
https://neftgaztek.ru/
Bonus de parrainage Binance
June 23, 2024Thank you for your sharing. I am worried that I lack creative ideas. It is your article that makes me full of hope. Thank you. But, I have a question, can you help me?
3d_aikt
July 11, 2024Ювелирный 3D принтер по выгодной цене, 3D печать для ювелирных изделий, Купите 3D принтер для ювелирных изделий с доставкой, Суперпредложение: 3D печать для ювелиров, Где купить профессиональный 3D принтер для ювелиров, Выбор профессионалов: 3D печать для ювелиров, Покупайте 3D принтеры для ювелиров по выгодной цене, Лучшие цены на ювелирные 3D принтеры, Где заказать 3D принтер для ювелирных изделий с гарантией, Выбор ювелиров: 3D печать на заказ, Где купить качественный 3D принтер для ювелирных изделий по выгодной цене, Новинки 3D печати для ювелиров, 3D принтеры для создания украшений: лучшие предложения, Купите качественный 3D принтер для ювелирного производства легко, Инновационные 3D принтеры для создания украшений, Где купить высококачественный 3D принтер для ювелиров, Специальное предложение: 3D принтеры для ювелира.
3д принтер ювелирный цена https://www.printerddd-yuvelirnyj3.ru/ .
lazernyy_rvPa
July 12, 2024Как выбрать лазерный 3D сканер для профессионального использования, подробный обзор.
Где можно приобрести качественный лазерный 3D сканер?, гарантированное качество.
Где найти дешевые лазерные 3D сканеры?, скидки и акции.
Выберите лучший лазерный 3D сканер для вашего бизнеса, специалисты рекомендуют.
Как выбрать качественный лазерный 3D сканер для дома?, плюсы и минусы.
лазерный 3d сканер купить https://www.lazernyjddd-skaner3.ru .
Stomatolog_fjEr
July 13, 2024Зачем нужны стоматологические 3D-принтеры|Возможности стоматологических 3D-принтеров: новейшие технологии для вашей улыбки|Сравнение стоматологических 3D-принтеров: что лучше выбрать для своей клиники|Какие материалы используются для печати стоматологических конструкций|Секреты использования 3D-принтеров в стоматологии|Какие преимущества получат пациенты благодаря стоматологическим 3D-принтерам|Почему стоматологические клиники все чаще переходят на использование 3D-принтеров|Какие новые методы лечения появились благодаря стоматологическим 3D-принтерам|Новые возможности для стоматологии: как принципы 3D-печати меняют отрасль|Новые методы изготовления протезов и конструкций в стоматологии благодаря 3D-принтерам|Новые методы применения стоматологических 3D-принтеров в медицине|Стоматологические 3D-принтеры и будущее стоматологии|Что такое биопечать и как она меняет стоматологию|Какие преимущества получают врачи и пациенты благодаря использованию 3D-принтеров|Инновации в стоматологии: перспективы применения 3D-печати|Почему стоматологические клиники все чаще переходят на использование 3D-принтеров
3d принтеры стоматологические https://stomatologicheskie34-printery.ru/ .
StephenKex
July 20, 2024discover this info here trader joe